Main Menu

Fine-Tuning Your WWI German Uniform
©1997 by Steve Fisher
Illustrations ©1997 by Bill Marsh
Note: This article was discussed with Rick Keller of Great War Militaria and has his blessing. The uniform improvements detailed in this article (if GWM were to do the work) would add substantially to the cost of a basic uniform.
So you have bought yourself a German WWI tunic, trousers, and overcoat from GWM. They are, in my opinion, the best quality product of their kind available; but you can make them just a little better. If you are a perfectionist like me, you may want to make it a little closer to the real thing, and after all, that’s what this hobby is all about--doing it right, being just as authentic as possible, and (dare I say it?) having fun. Sometimes that last part gets forgotten. The steps described in this article are generally applicable to all German uniforms that have the particular features referred to.
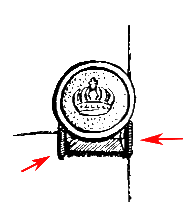
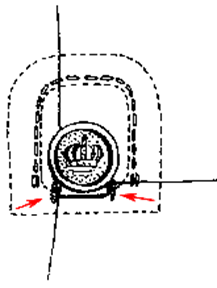
1. Brass buttons, side and rear hooks.
Unless these buttons have been painted as on the m.1915 or some simplified m.1910 tunics, you will need to do something about the bright yellow color.
Option #1 is to replace them with original tombak buttons.
Option #2 involves chemically subduing the color. Use Birchwood Casey’s “Super Blue” gun bluing solution on a cotton ball and wipe down all of the hooks and buttons until they turn black. Use a piece of cardboard with a “V” cut into it for a button board to avoid getting bluing on the cloth. Then rinse off the buttons and buff them with a dish-scrubbing pad or furniture refinishing pad to bring out the highlights. The effect is very close to that of original buttons.
2. Replace all of the plastic buttons.
Replace all of the plastic cuff, collar tab, overcoat skirt, and inside pocket buttons with either original horn, bakelite, celluloid, or hard rubber buttons in brown or black. Many antique shops have jars of antique buttons for cheap or… you can use modern, period-looking buttons--I recommend “LaPetite” #325 in size 5/8" from your local fabric store. Sew them on using an “X” pattern stitch, not the modern machine “||” stitch. Trouser buttons, with the general exception of the suspender buttons, were often of horn.

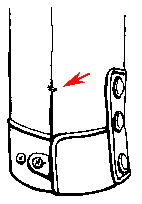
Short collar hooks look bad!
Long collar hook are best.
3. Replace the collar hooks and overcoat front hooks.
Replace the collar hooks and overcoat front hooks with larger and longer ones. These longer hooks are hard to find, but look more like the originals. The long hooks won’t slip out of the loops like the short ones will. Amish dry-goods stores sometimes carry these. Be sure to sew them on using heavy hand-sewing thread in tan or grey.

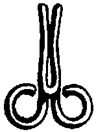
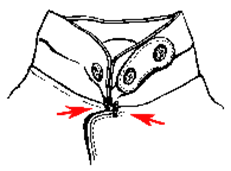
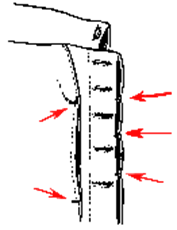
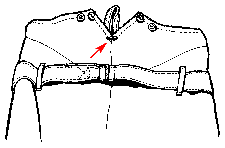
4. The reinforcement bar.
The reinforcement bar was a very common feature on all German uniforms and some fabric equipment. These were used anywhere the garment may be subjected to stress, such as the ends of the pocket slits or cuff slits. They were also used on overcoats to hook the large front flap closed. If you wear the Iron Cross First Class or
other awards, you can sew these bars on the uniform to hold the heavy pins so you don’t have to put them through the cloth itself. These bars are made by taking a piece of doubled thread and making three or four stitches over the spot to be reinforced.

The length of these stitches will determine the length of the bar. The stitches should be just a little shorter than you want the bar to be, as they will stretch a bit. Then, without cutting the thread, make buttonhole stitches over the bar until the supporting stitches are completely covered.
To make a buttonhole stitch, start at the left side. Hold the thread above the bar and bring the needle under the bar, then through the loop formed by the thread you are holding. Make it snug, then repeat. Start on the right side if you are left-handed.
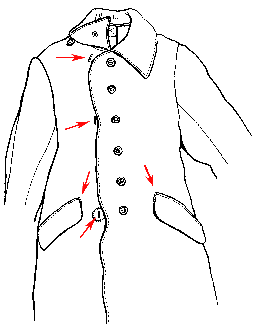
5. Reinforcements
Reinforcements may go on the following locations:
M.1910 tunic:
Top of rear cuff adjustment slits;
On either side of the rear belt hooks;
Front and rear of the front pocket flaps;
And on either side of the collar, reinforcing the points where it attaches to the tunic body. You can also put them on either side of the side hooks, particularly if they are the removable type.
M.1914 Vereinfachte (also called the "Transitional" by collectors) and M.1915 "Bluse"
Front and rear of the turnbacks to anchor them up; On either side of the rear belt hooks; On the ends of the front pocket flaps;
Along the front fly on the M.1915 tunic to hold the fly to the buttonhole flap.
Important note: When making loops for hooks or the Iron Cross, do not catch any of the wool fabric in the bar. When reinforcing the fabric at stress points, you will want to stitch into the wool, as this helps hold the bar to the fabric and makes it stronger.
Overcoats

Front and rear of the pocket flaps; Used as a loop for the top and waist hooks for the coat’s closure;
Used along the sides of the skirt to hook up the skirt corners (French style). Also, there is a bar on the rear-belt to hold the flap down
Trousers
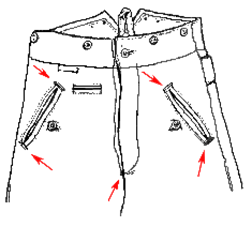
Used on front and back of the pocket slits and at the base of the rear waist split.
6. Internal stampings.
Most stampings were located on the inner left breast of coats and on the front inside right of trousers. Unless you have access to the proper rubber stamps, these will be difficult to duplicate.
Typical Stamps are:
B.A. VI 1916 Which stands for: Bekleidungsamt des VI (6th) Armeekorps; indicates Army Corps acceptance, accompanied by a date.
J.R. 63 Which stands for: Infanterie-Regiment 63 (the German printed “I” looks like a “J”); Unit designation, frequently used. [So of course, also J.R. 111, J.R. 23, J.R. 92, J.R. 120, J.R. 459 etc.]
8.K Which stands for: 8. Kompagnie; Often, the company is indicated.
I, II, III, IV Garnitür stamp; Roman numeral indicating issue grade (suitability for various duties) of the item.
I=Field Service
II=Parade
III=Walking-out
IV=Daily duty
B.J.A. If the garment was repaired, it was stamped like this to indicate it had been repaired.Size stampings for the tunic may be found inside. [This will be covered under the Stamp article] Lastly, the soldier may sew in a laundry label with his name and unit indicated on it. The name may also be written on the lining itself. If this is your choice, please use a period pen or indelible (purple) pencil to mark it with--no ballpoints please.
A final note on stampings; uniforms often included some of the above markings, but not always all of them.
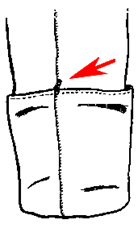
6. A Unique Feature on German Trousers.
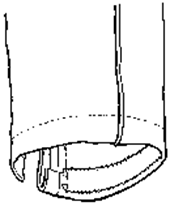
A unique feature on German trousers was a strip of white cotton twill (approx. 2" wide) sewn to the inside of the cuff and tacked in place, thus preventing (I assume) the cuff from filling with dirt and protecting the wool from boot polish. The white twill is easy replaced when it gets too dirty. This feature may have been dropped from late production trousers.
The twill can be sewn on with a whipstitch (overcast stitch) and should cover the raw edge of the wool.
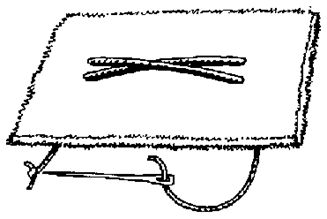
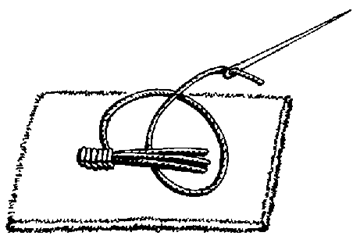
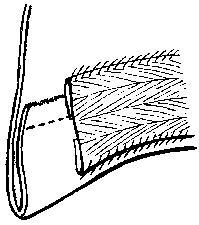
7. Support Hooks.
German uniforms utilize four hooks to help support the weight of the belt and its equipment. The two straight side hooks and the two rear “button” hooks are sewn into the tunic itself in order to better distribute the weight. Needless to say, the hooks get a lot of wear and tear, and after a time, they may come loose. If you need to repair these, or if you are “A-R”, you may want to replace them in the same manner in which the originals were installed. First, they were sewn to a piece of heavy wool shaped like an upside-down “U”. Cut the wool about 1/2” larger around than the back plate of the hook.
Use heavy hand-sewing thread and sew the hook plate onto the wool patch. Then, sew the patch onto the inside of the uniform, letting the hook come out through the seam. Use small stitches. Add the reinforcing bars (item #4 above) on either side of the hook to hold the seam closed, if you wish. Follow the same procedure for side hooks. Be sure to use heavy hand-sewing thread, preferably in linen, cotton, or silk. Ordinary thread used in sewing machines will not be strong enough.
Note: The above construction details have been noted through the careful study of items in both my own and in the Great War Militaria Collection (consisting of 40 tunics, 5 overcoats, 8 trousers). The features discussed seem to be common on most of the uniforms studied, but not on all. My thanks go to GWM for generously allowing me access to their collection.
Click Here to download this Article
(Right click and select "Save link as" to download the PDF to your computer)